

LEAD WELDING
Lead welding, commonly referred to as lead burning, is used to join lead sheet without mechanical fixings.
A correctly welded joint provides a strong, watertight connection suitable for roofing applications.
.jpeg)
01
Preparation
Arrange the work so the seam can be welded in the easiest position possible. Flat supported seams are generally easier than upright or inclined seams.
The meeting edges and faces of the lead must be clean and in close contact. Any dirt, oxidation or contamination should be removed before welding. A shave hook or similar tool may be used where necessary.
No flux or tallow should be used for lead welding.
If welding a flat butted seam, the weld should penetrate fully through the thickness of the sheet. If welding a lapped seam, the weld should fuse the surface properly without penetrating through to the underside.
02
Setting the flame
A clean neutral flame should be used for welding lead.
With oxy-acetylene equipment, the flame must be adjusted carefully so it is neither carburising nor oxidising. Both of these are unsuitable for welding lead sheet.
The nozzle size should suit the thickness of the lead and the type of seam being welded. Smaller nozzles are used for lighter codes, while thicker lead may require a larger nozzle.
The hottest working part of the flame is just in front of the inner cone, and this is the area used to control the weld.

.jpeg)
03
Tack and Position the Joint
Before running the seam, the sheets are usually held together with spot welds or tacks to prevent movement and to keep the meeting faces in close contact.
Where filler rod is used, it should be of similar composition to the parent lead. The filler rod must also be clean.
For flat butted seams, ensure the sheets are aligned closely and supported properly before starting the weld.
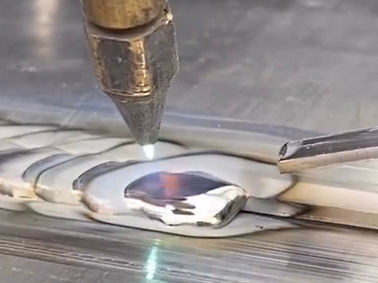
04
Form the Weld Pool
Bring the flame to the joint and heat both sides evenly.
The tip of the flame cone should be held just clear of the surface of the molten lead. The aim is to form a controlled molten pool without overheating the surrounding sheet.
At the same time, feed the filler rod into the weld area so that the molten lead builds into a seam of the correct thickness.
A sound weld should be slightly proud of the sheet, usually around one-third to one-half thicker than the parent lead.
.jpeg)
05
Progress Along the Seam
Move the flame steadily along the centre of the seam while maintaining control of the molten pool.
Progress can be straight forward or slightly side to side depending on the seam and the method being used. A quicker straight progression tends to produce a narrower seam pattern, while a slower side-to-side movement produces a rounder pattern and is often preferred for in-situ work.
The width of the weld depends on the thickness of the lead sheet, the seam type, and the loading required. Wider welds are needed for heavier codes.
The weld should remain even in width and appearance throughout.
06
Avoid Undercutting
Care must be taken not to reduce the thickness of the lead at the edges of the weld.
Undercutting is usually caused by holding the flame too long in the molten pool or by using too little filler rod. It creates a weak point that may lead to cracking along the weld line.
This is especially important on upright and inclined seams, where the flame can more easily overheat one side of the joint.
If working outdoors in windy conditions, flame position may need adjusting to keep the heat balanced across the seam.


07
Check the Finished Weld
A completed weld should be smooth, consistent, and properly fused.
The seam should show no pinholes, weak spots or undercut edges. The weld should be strong enough for the detail and neat enough to suit the finished leadwork.
Finished work should also be protected from damage, particularly where there will be foot traffic or follow-on trades working above it.